Do-it-yourself grill and stove with your own hands: arrangement, chairs and video
The functionality of the complex, which consists of a barbecue and a basin for placing a cauldron, begins with the design of its design.
Features of the design
A brazier with a boiler can be built in two options:
- , in which there is a device for hanging the cauldron.
- A set of barbecue grills and stoves for cauldrons.
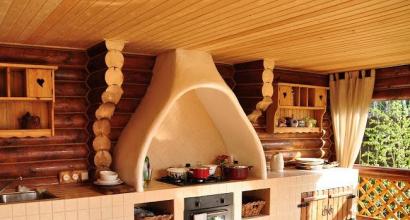
A simple roasting pan with a cauldron
The first option is the simplest. This project conveys the do-it-yourself reality of a one-piece structure with two chambers, a smoke collector and a fire chamber. To complete the project, you need to make a standard barbecue grill with your own hands.
So that you can place the cauldron, you need to transfer the power of raising the pot near the roasting pan. The container must be hung in such a way that it is above the fire and does not become overpowered by the time of adding firewood.
The procedure for raising the cauldron is as follows:
- put in two little bundles. You need to place your hands so that you look down. The pieces should be placed on the transverse sides of the roasting chamber and protrude from the masonry by 10-15 cm. For their best fixation, cut slits under them in the clay. The skin fold is forced to fit tightly at the slit;
- take a metal pipe with your own hands and weld the hook to the middle;
- place the pipe on the piles and hang the boiler.
The disadvantage of such a project, which is shown in many photos, is the small amount of herbs that can be prepared in a cauldron.
The design itself is suitable for cooking with smoke, triple yushka, grenadier kulesh and similar herbs. Savory pilaf or any other similar dish cannot be prepared with your own hands in a cauldron over a fire.
Large folding project
Of course, you can do it in such a way that you can cook shish kebab and pilaf in one chamber. However, it’s even more complicated. On the right is the flow of heat under the hour of the fire in the roasting pan and in the classic outdoor oven under the cauldron and is different. At the first episode, heat rises to the top and greatly heats the crypt. At this point, the frying chambers retain a little heat. The principle of a robotic barbecue is often depicted in videos.
In a traditional outdoor stove under a cauldron, heat may evenly fall on all sides of the firebox. It does not go straight up the hill, but goes straight to the cuticles and under the skin wall. Invariably, a boiler that is completely clogged in the firebox and is left above the hob heats up from both sides. The very same spirits are necessary for the preparation of classic herbs. This is often mentioned in the video.
To create a perfect grill-cauldron with two operating modes, you need to master a lot of technical tricks. The result of their stagnation will be a massive fire, so as not to sacrifice the Russian one for the sake of simplicity.
Naturally, a leather baker can develop a project for such a design in his own way. However, we definitely include a lot of load-bearing steel elements.
Basically, the smells will be distilled to create with your own hands the rivets of the cooking niche and under the frying pan. Steel elements are particularly weak. This is due to the fact that when heated, the shells and seals expand differently. As a result, the steel parts bend and the masonry loosens. The service life of such a folding grill using a cauldron will be short.
Pies for kebabs and baked goods for cauldrons
Such a project conveys the do-it-yourself feel of a barbecue and next to it a traditional stove and cauldron.. In case of any offence, the structure is closed and does not bind to each other. Of course, for the sake of beauty, you will have to create a seam between them that will connect. The features of this creation can be seen in the video.
The advantages of this option are:
- Ease of implementation. The design is not offended by the ingenious schemes with folding seats.
- Possibility of choosing a project for an object.
- Possibility of continuous activity of the skin part.
 It’s easy to say that under the classic stove under the cauldron, the design that transfers the furnace with the shape of a cylinder is important. They are shown in various photos. The armchair of such a stove is foldable, the lower armchair of a traditional wood-burning stove. In the remaining pot, place it in such a way that it binds the bottom rows and creates a square firebox. In addition to simplicity, it is also more economical. In order to obtain the necessary ingredients for preparing herbs on a traditional stove under a cauldron, you need to burn a lot of wood. This is mentioned in various videos.
The option of a simple stove instead of a traditional stove with a round firebox is also a great solution. To implement such a project, it is necessary to add a special stove under the boiler.
You need to place it with your own hands on the stove with burners. You won’t be able to create masterpieces of a similar kitchen on such a stove. These kitchens will turn out even more decent.
Tools
Ikhniy perelik includes:
- Corito for rozchinu.
- Vidro.
- Cologne.
- A shovel.
- Drill.
- Bouquet mixer.
- Kiyanku.
- Bulgarian.
- Rhubarb.
Materials
To set up a barbecue with a boiler you need:
- The fireclay fire is strong.
- Clay.
- Pisok.
- Cement.
- Reinforced mesh.
- Wooden boards.
- Ruberoid.
- Steel sheets.
- Kutochki.
- Doors for the blower and firebox.
- Grate.
- A stove for a cauldron.
Sequence of waking hours
It includes the following stages:
- Select a project in the following order.
- Digging the foundation pit and preparing the formwork.
- Pouring the foundation.
- Waterproofing.
- Budivnitstvo grill.
- Construction of the stove under the cauldron.
Digging the pit and pouring the foundation
Alongside the design, the barbecue and stove under the cauldron can be placed on the same place. The depth is determined by focusing on a structure with great dimensions, like a barbecue. If the grill has 33 rows of target, then the thickness of the concrete slab will need to be 50 cm. The pit should be dug deeper, another 10 cm of fragments will be needed for the sand ball.  Also make it so that the width and bottom are 10 cm larger than these characteristics of the final integral design. These particularities are often emphasized in different videos.
At the dug pit, the formwork is broken and sand begins to fall asleep.. Next, place a stone that is 5 cm high, and install a reinforcing mesh around it. The area under the mesh will be filled with cement rubble.
After all, the foundation is poured. In this case, it is necessary to work in such a way that it protrudes 10 cm above the ground. Having finished drying the concrete base, it is covered with roofing felt. It is imperative to lay two balls of this material with your own hands.
Budivnytstvo
The laying of the barbecue placed in the new oven begins with the laying of the first row without a screed. the process is like this:
- The stalk is placed on the stalk. The stench is about to be created.
- A cord is stretched between the placed whole.
- Laying the other side of the first row.
- Checking the correctness of the inserted target. For whom the diagonals of the created rectilinear plane are vibrating. If the stench is equal, then you can invest your money in the destruction. However, it is necessary to make adjustments to the masonry of the target.
Next, place the target in the first row for distribution. In this case, the seams should be cut 3-4 mm. All upcoming processes are completed in the correct order with step-by-step instructions.
Simple design of a kebab oven
Our everyday life is like this:
- masonry of two lower rows;
- laying three walls two lengths wide. The stench is to blame for the perimeter of the already created rectangular plant. There will be no front wall;
- on the 10th row, begin to form the arch;
- on this row in the side, cut out the virises to accommodate the steel sheet or steel braids;
- Then lay out two continuous rows of targets. Part of the top will be the bottom of the roasting pan. It is laid out from a fireclay target. In accordance with the recommendations given by professional videos, the seam between them and the red whole should be 6-13 mm. Lay out all the walls of the brazier using fireclay clay;
- laying the next 8 rows of the target. Place the barrels on the back wall of the barbecue. At the top of the masonry there is the letter “P”;
- cut in the outermost line of the 21st row of grooves to accommodate the bun. There is an arch in front of them. It is necessary to place a pedestal on them, as it will be part of the front wall of the barbecue;